On this page
- Create your club
- Set up and go public
- Complete club settings
- Use the admin dashboard
- Add your management team
- Add and manage ride leaders
- Publish rides
- Manage signups and attendance
- Keep members informed
- View and manage the member roster
- Handle paid club dues
- Sell club merchandise
- Embed rides on your website
- Use advanced ride options
- Transfer club ownership
- Set up weather auto-cancel
- Receive member messages
- Use ride polls
- Share rides
- Messages from Paceline
1. Create your club
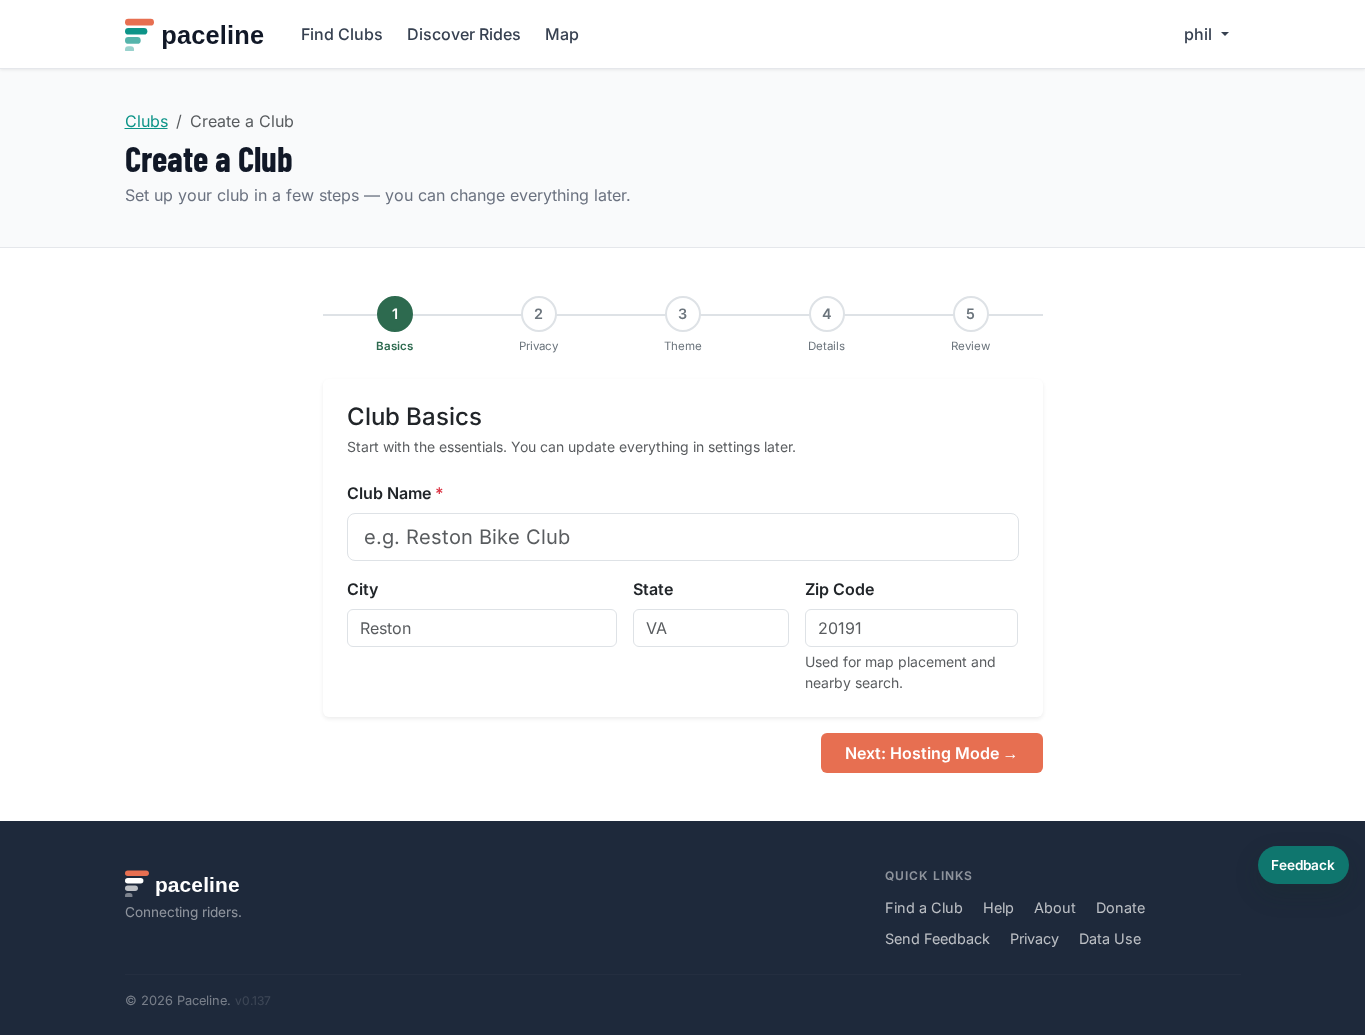
Sign in, choose Create a Club, and enter the club name, city, state, and zip code. The zip code helps riders find your club on the map and in nearby searches.
Every new club starts hidden. It will not appear in the directory, map, or search results until you unhide it from Settings. This gives you time to fill in the details before riders find you.
During setup you will choose a hosting mode:
- Full Club: The complete Paceline experience — membership management, waivers, dues tracking, news posts, safety guidelines, and a full public club page. Best for established clubs that want everything managed in one place.
- Rides Only: A simplified ride calendar with no membership management. Riders can view and sign up for rides without needing to join the club. Great for clubs that already have a website and just want an easy way to publish and share rides.
You can switch modes at any time from Admin → Settings → Hosting Mode. All ride data is preserved when you switch.
In Full Club mode you can also choose whether the club is public or private. Public clubs are easy for anyone to join. Private clubs are better when you want to approve or invite members before they participate.
2. Set up and go public
After creating your club you land on the admin dashboard. Complete these steps before you unhide the club:
- Open Settings and fill in the description, contact email, location, and any membership rules.
- Add your management team on the Team page.
- Create your first few rides so new members have something to sign up for.
- When you are ready to go public, return to Settings and uncheck "Hide club from public listings" under Visibility, then click Save Settings.
You can hide the club again at any time — for example during an off-season hiatus — and unhide it when you are ready to resume.
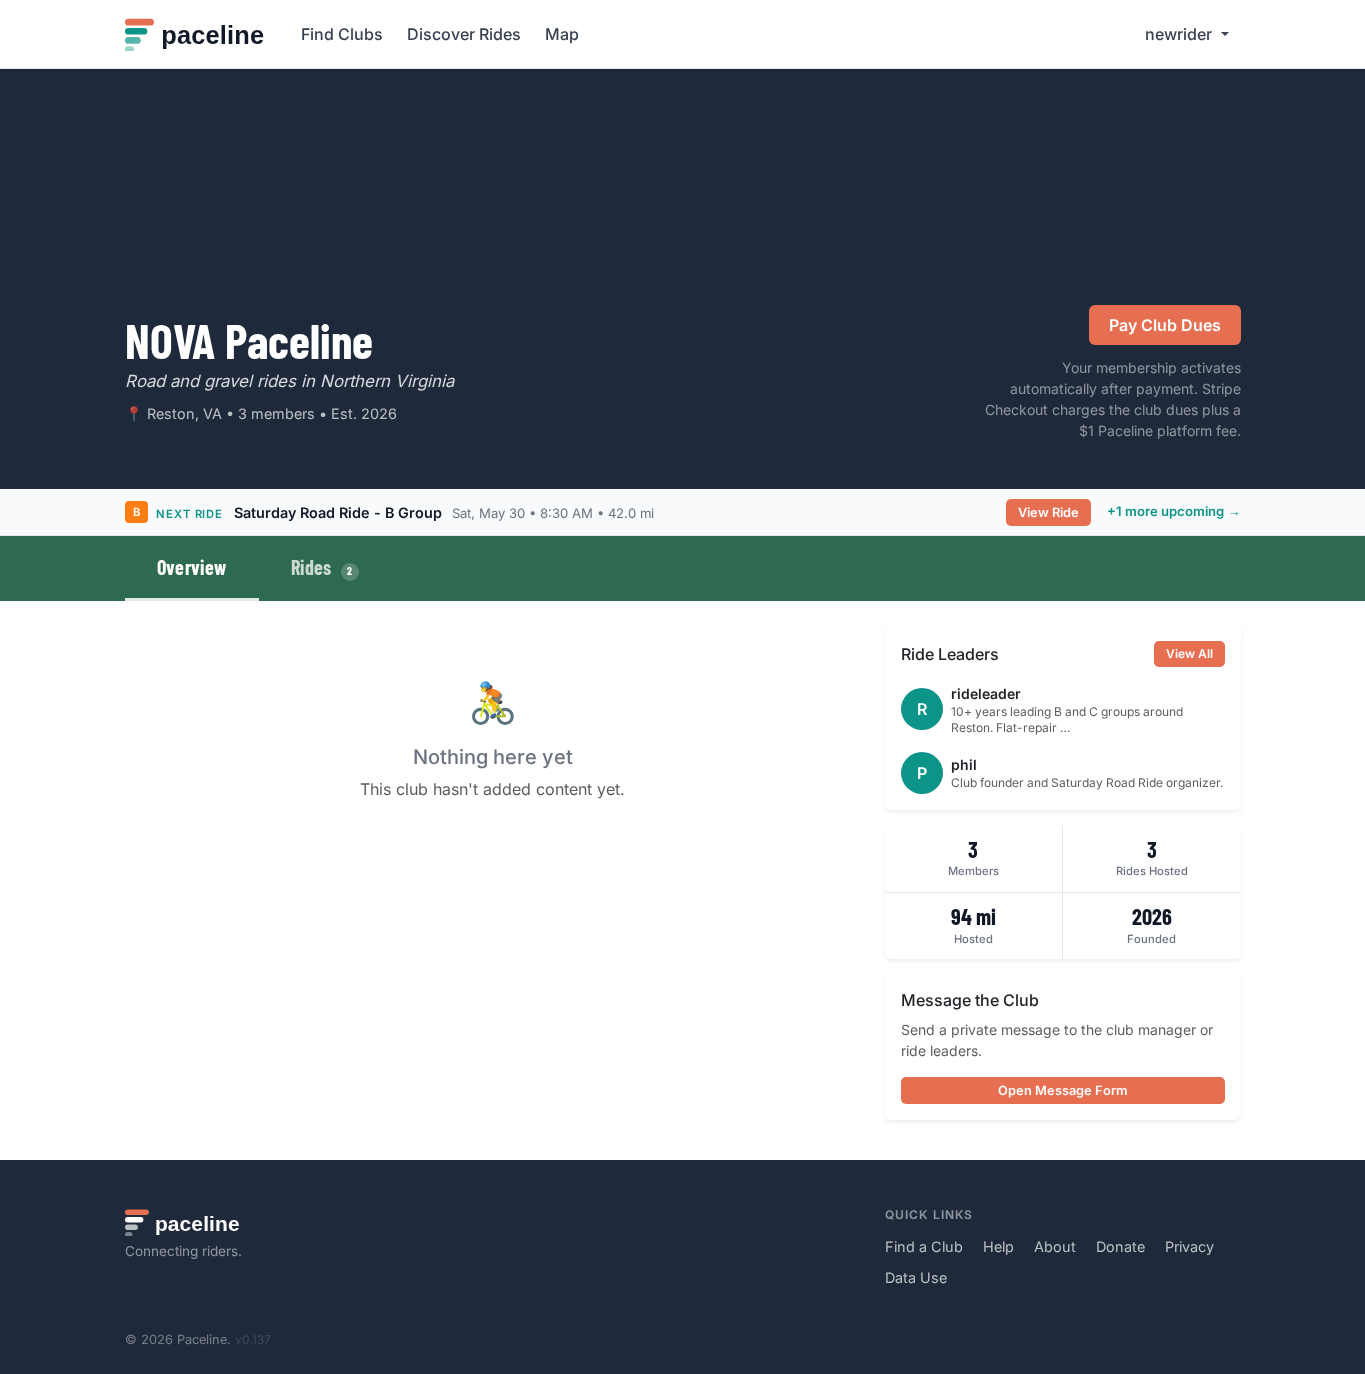
Club directory cards show compact quality signals such as Verified, upcoming ride count, New rider friendly, Online dues, shop availability, and ride-hosting mode. Keep rides current and settings complete so riders can quickly tell the club is active.
3. Complete club settings
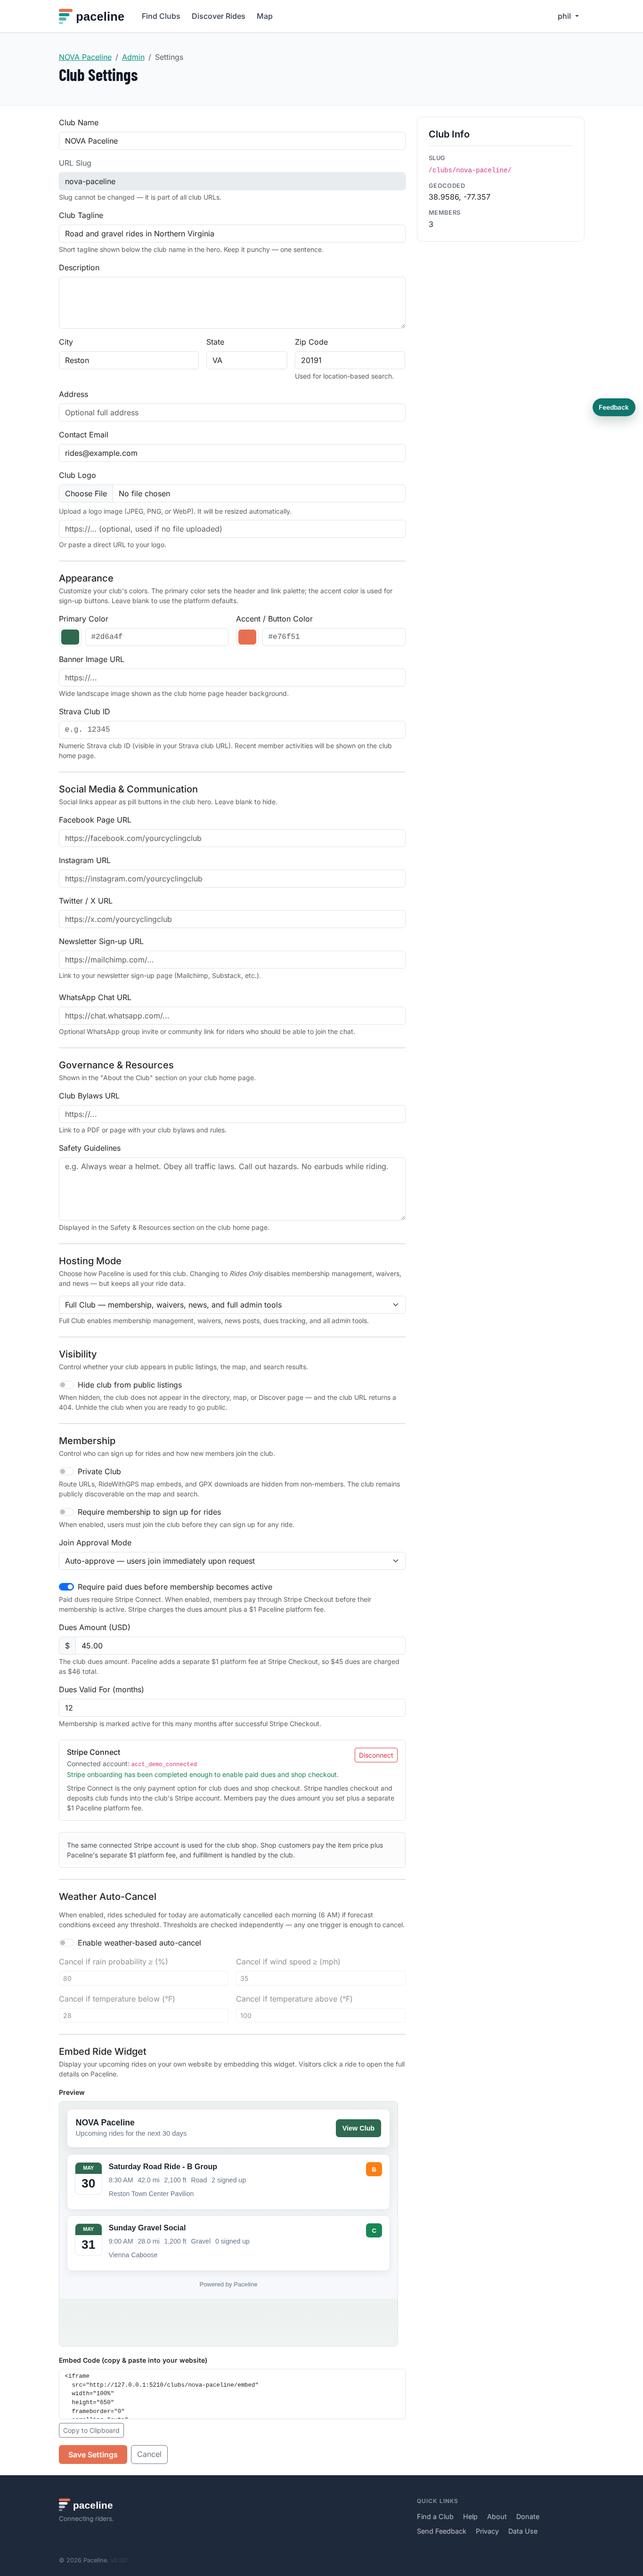
From your club page, open Admin, then Settings. Add a tagline, description, contact email, logo, banner image, social links, membership settings, safety guidelines, and club bylaws if you have them.
Keep the description short and practical: who you are, where you ride, what pace groups you offer, and how new riders should get started.
Use the admin dashboard
The club admin dashboard shows the club setup checklist, upcoming rides, and a lightweight activity panel. Use the checklist when launching a new club so riders see useful details from day one.
The activity panel summarizes the last 30 days and next 30 days: new members, ride signups, past/upcoming ride count, recent Stripe payment volume, and ride type mix. It is meant to answer a simple question: is this club page actually being used?

4. Add your management team
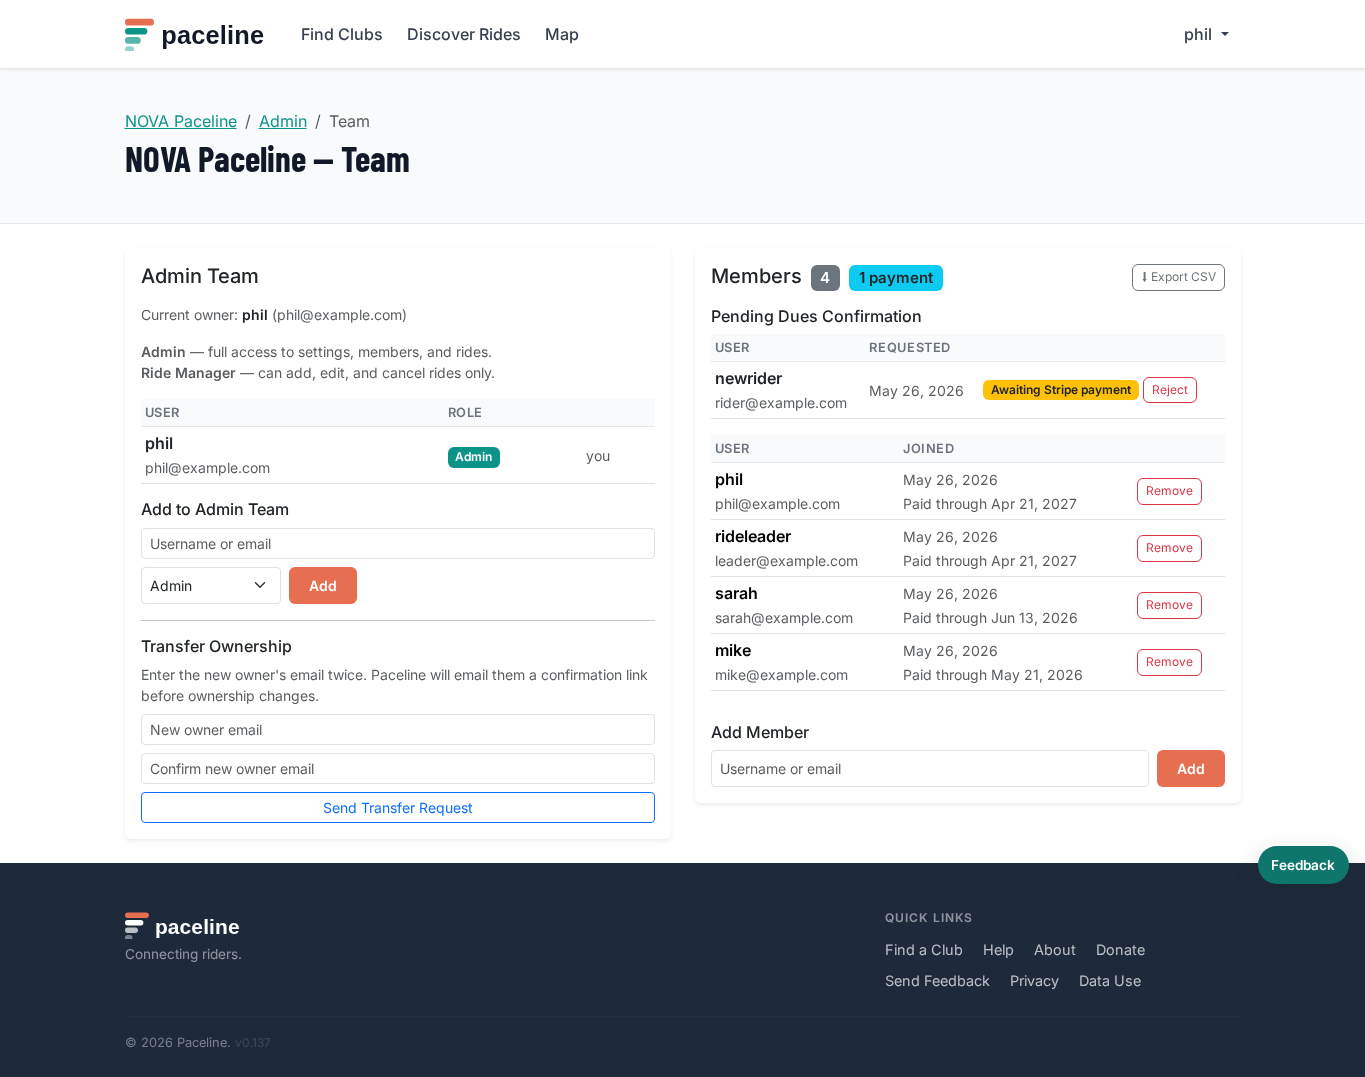
Open Admin, then Team. Add members by username or email and choose the right role:
- Admin: manages settings, members, rides, and content.
- Ride manager: creates and manages rides.
- Content editor: updates news posts and club content.
- Treasurer: views and exports member information.
The Team page also handles two membership queues:
- Pending approval — riders who requested to join a club that requires manual approval. Click Approve or Reject.
- Pending payment — members who joined a club with required dues but have not yet completed Stripe Checkout.
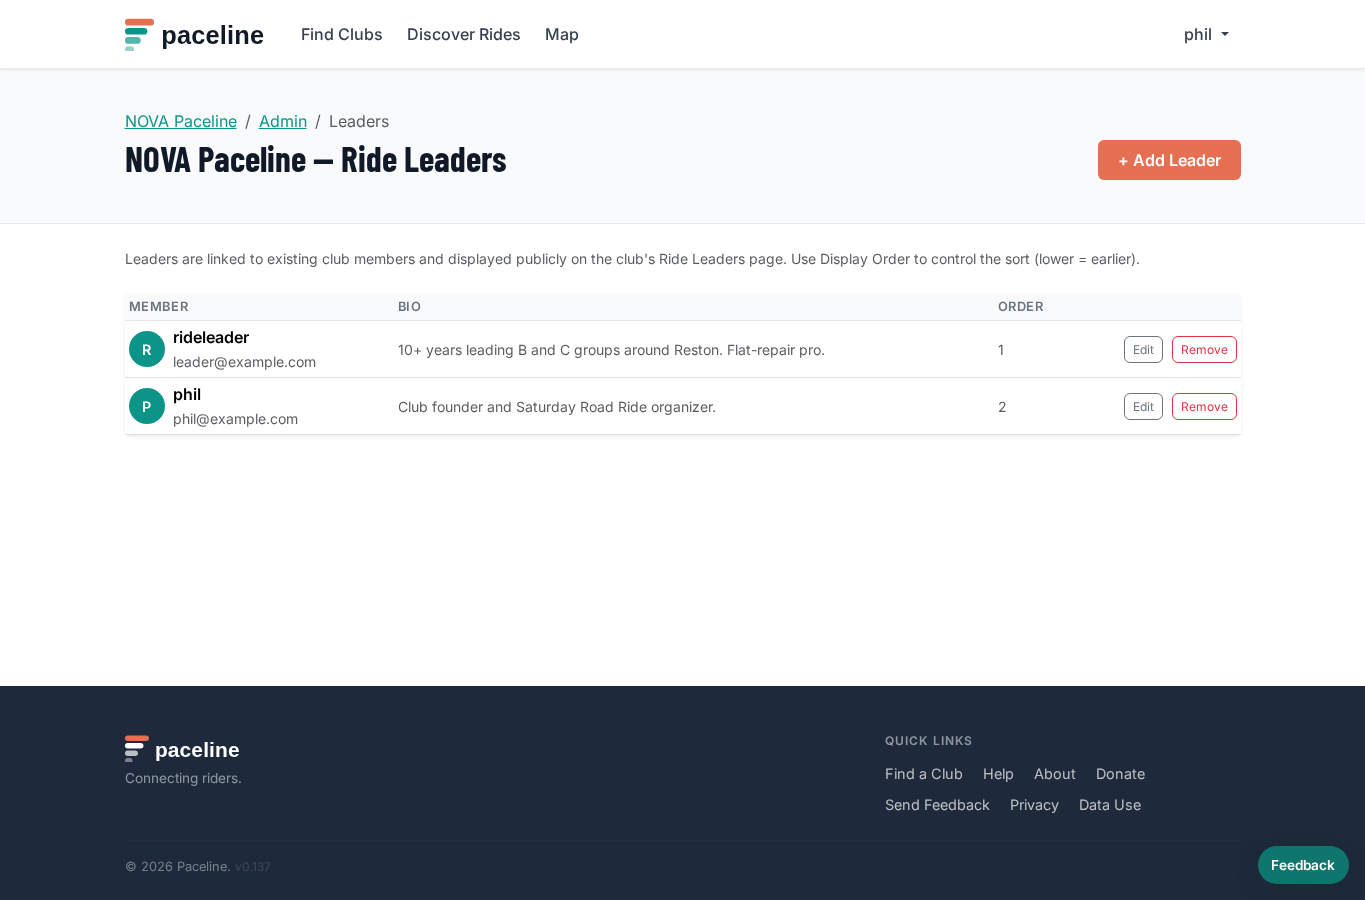
5. Add and manage ride leaders
Open Admin, then Leaders. Ride leaders are displayed on your club's public Leaders page with their photo, name, and a short bio.
To add a leader, click Add Leader. Choose the member from the dropdown — the list shows current active members. If the club requires paid dues, only members with current dues appear. Fill in an optional one-line bio and a display order number (lower numbers appear first). Click Save.
The leader's photo is pulled automatically from their Paceline profile. If they have uploaded a profile photo it appears as a circular avatar. If they have linked Strava, their Strava profile photo is used as a fallback. Encourage leaders to upload a profile photo directly on Paceline for the best result.
To edit a leader's bio or display order, click the pencil icon in the leaders table. To remove a leader from the list, click the trash icon — this removes them from the public Leaders page but does not affect their club membership.
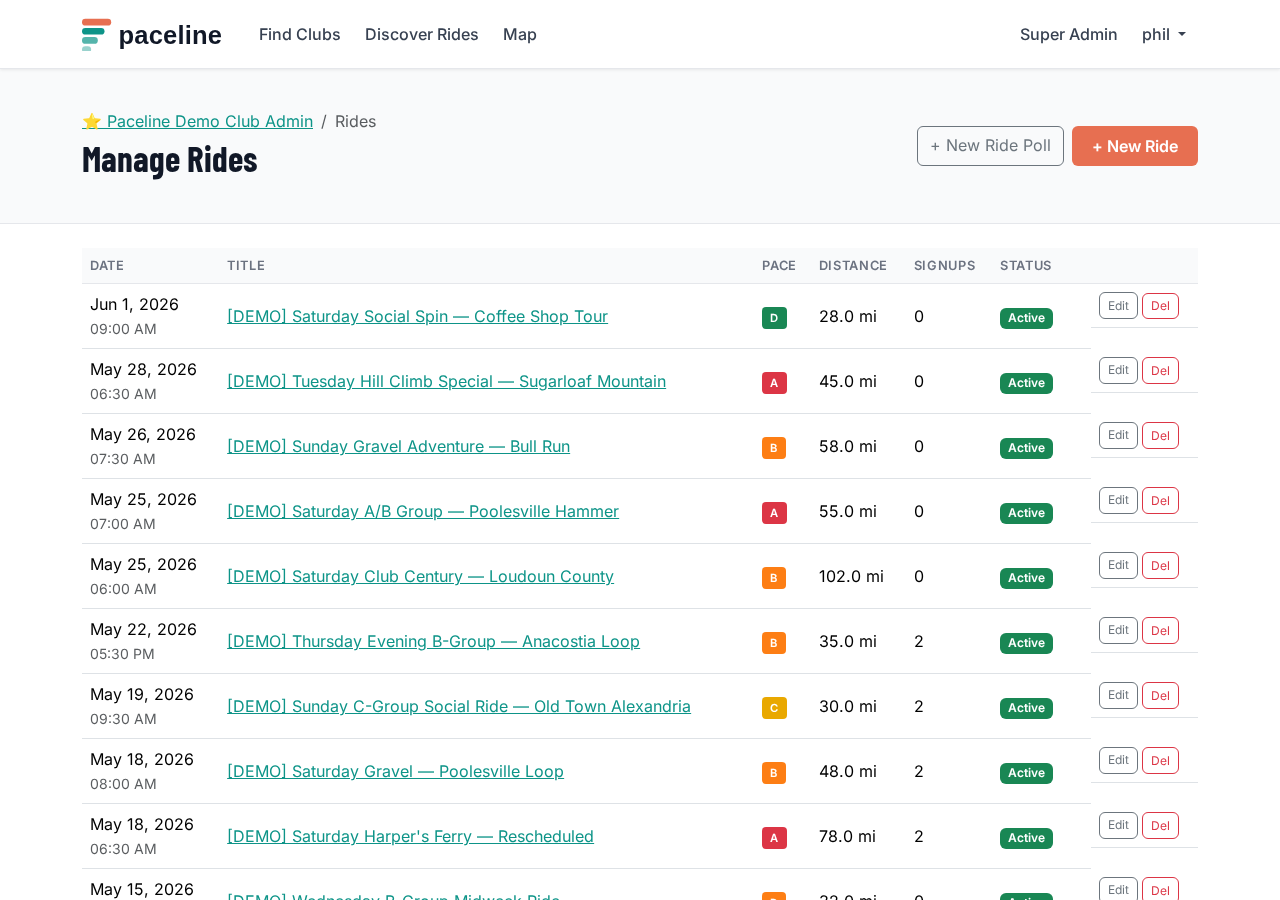
6. Publish rides
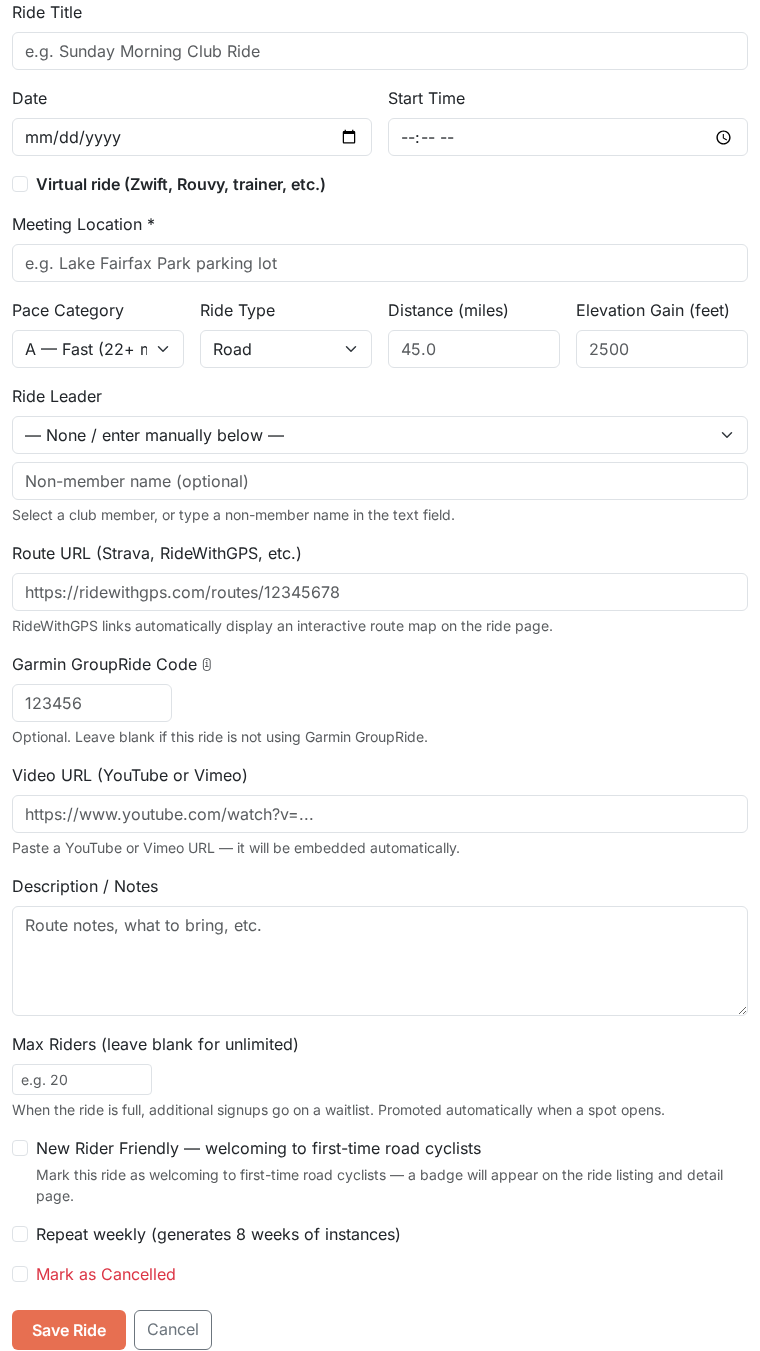
Go to Admin, then Rides, and choose New Ride. Add the ride title, date, start time, meeting location, distance, pace, ride type, leader, route link, and notes.
Use clear titles and notes. Include regroup expectations, drop/no-drop information, parking details, and anything riders should bring.
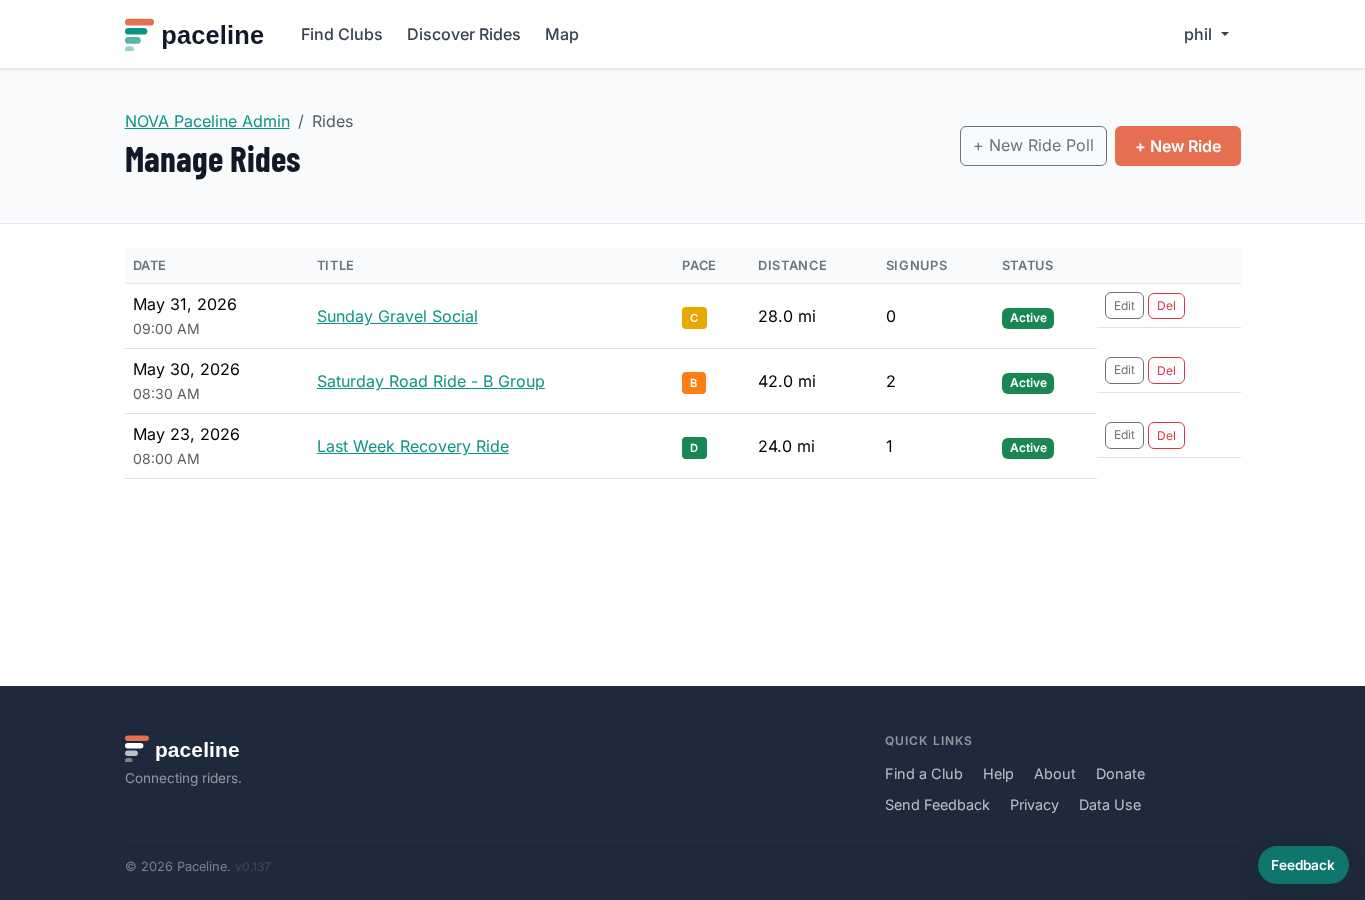
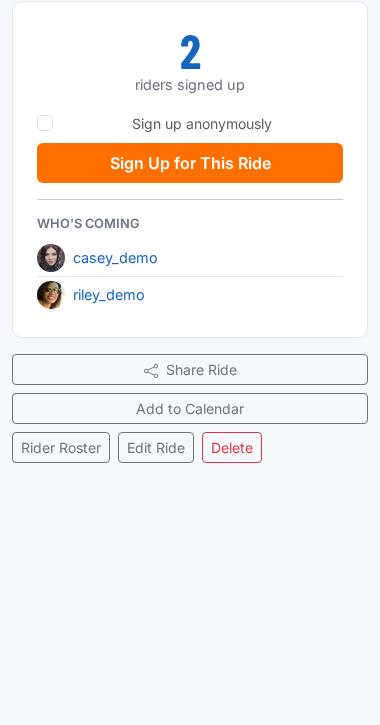
7. Manage signups and attendance
Open a ride from the admin ride list to view the roster. You can see who signed up, manage waitlists, and record attendance after the ride.
If a ride needs to be canceled, edit the ride and mark it as canceled. Riders will see the cancellation on the ride page and receive a notification email if they have that option enabled.
8. Keep members informed
Use News from the admin dashboard for club announcements, schedule updates, event reminders, and other short updates.
New ride emails and club news emails are sent right away to active club members who have those notification types enabled. Ride cancellation emails and waitlist promotion emails are also sent immediately so riders can adjust their plans.
Message board notifications work differently: new subscribed posts, replies, and mentions are collected into a daily digest. This keeps discussion useful without sending a separate email for every board event.
Members control optional notification preferences from their own Profile page. Superadmins can also set a daily per-user email cap to prevent accidental high-volume email sends.
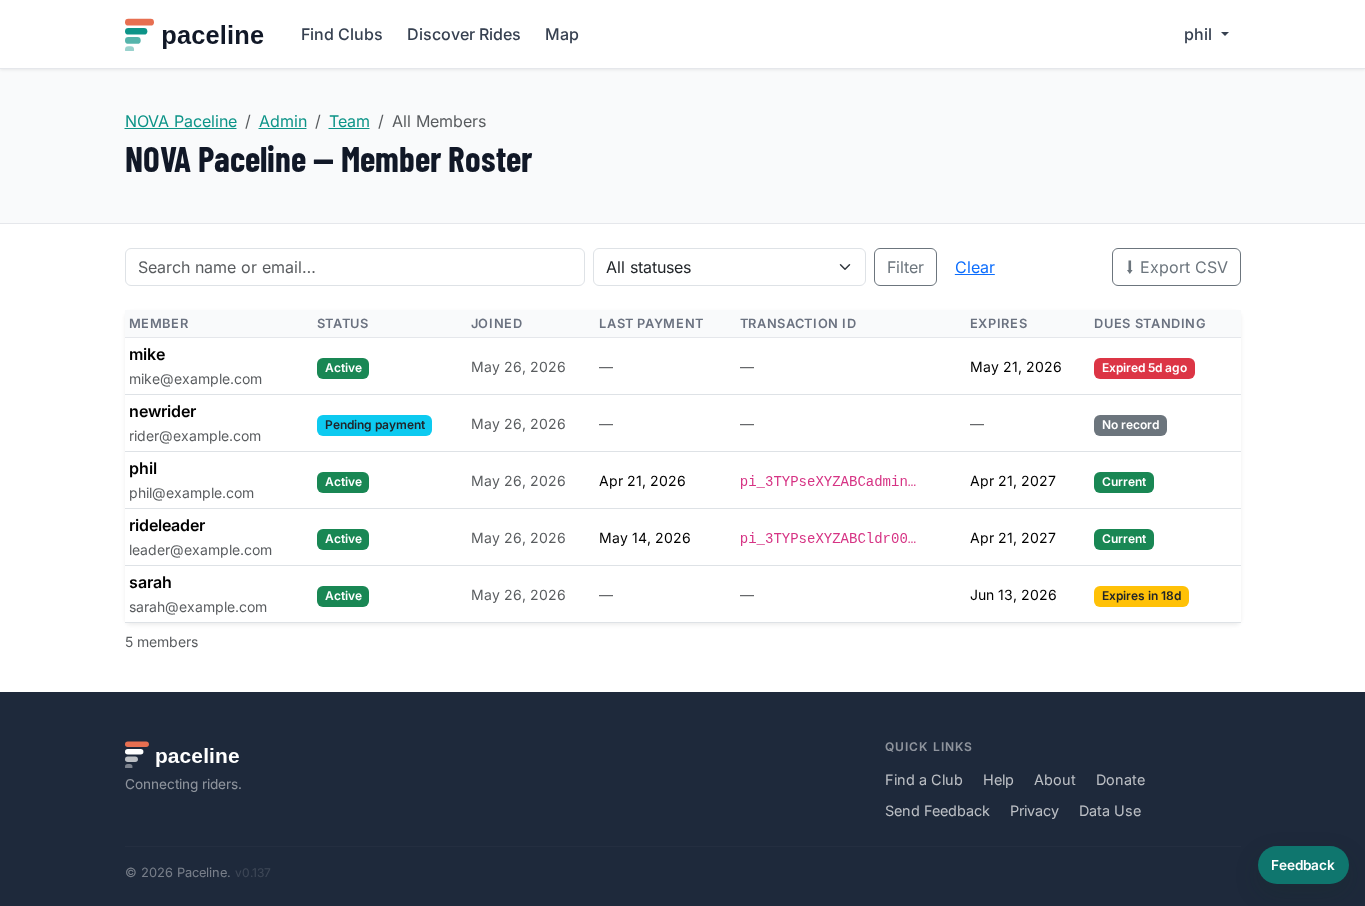
9. View and manage the member roster
Open Admin, then Members to see a full roster of everyone who has joined the club. You can search by name or email and filter by membership status:
- Active — full members with access to all ride signups and club features.
- Dues expired — previously active members whose paid membership period has ended. They need to renew before Paceline marks them active again.
- Pending payment — riders who joined but have not completed Stripe Checkout.
- Pending approval — riders waiting for a manual join approval from the Team page.
When the club has required dues enabled, the roster gains four additional columns for each member:
- Last Payment — the date dues were confirmed by Stripe.
- Transaction ID — the Stripe payment intent ID for automatic payments. Click the truncated ID to copy the full value to your clipboard.
- Expires — the date the current membership period ends, calculated from the payment date plus the configured duration.
- Dues Standing — a color-coded badge: green "Current" means the membership is paid and active; yellow "Expires in N days" warns within 30 days; red "Expired N days ago" marks lapsed memberships; grey "No record" means no payment has been recorded yet.
Click Export CSV to download the full filtered roster as a spreadsheet, including all dues columns. This is useful for record-keeping and for sharing member data with treasurers or board members.
10. Handle paid club dues
Paceline supports paid club dues through Stripe Connect only. A club must connect its own Stripe account before paid dues can be enabled. Paceline does not provide an outside-payment/manual dues workflow for new member payments.
Stripe Connect dues
Stripe Connect automates the entire payment and activation flow. When a rider clicks Pay Club Dues on the club page, Paceline opens a Stripe Checkout session. The rider enters their card details on Stripe's secure hosted page. After payment Stripe notifies Paceline via webhook, and Paceline immediately marks the membership active — no admin action required.
Payments are processed as direct charges on your club's connected Stripe account, meaning the charge is created on your club's Stripe account. Paceline does not hold club dues — it acts only as a platform facilitator. Paceline adds a separate $1 platform fee to each checkout. For example, if your club sets dues at $45, the rider pays $46 total at Stripe Checkout. Clubs handle their own refunds, payment questions, and disputes through their Stripe account. Paceline's $1 platform fee is not refunded when a club refunds dues.
The same connected Stripe account is also required for the club shop, where clubs can sell jerseys, shirts, and other club items.
Setting up Stripe Connect
You need a Stripe account before you start. If you do not have one, Stripe's onboarding will walk you through creating one.
For security, Paceline may ask you to sign in again before starting Stripe onboarding or disconnecting Stripe. This protects club payment settings if a browser session was left open.
- Open Admin → Settings and scroll to the Membership section.
- Under Stripe Connect, click Connect Stripe. You are redirected to Stripe's hosted onboarding where you enter your club's business information, bank account details, and verify identity.
- Complete all steps in Stripe's onboarding and click the button to return to Paceline.
- Paceline verifies the connection. When onboarding is complete, Settings shows a green "Stripe onboarding has been completed" confirmation and the club account ID.
- Enable the Require dues for membership toggle.
- Enter the Dues Amount — the amount your club charges per membership period. Paceline adds a separate $1 platform fee at checkout, so $45 dues are charged as $46 total.
- Set the Membership Duration in months. Paceline calculates the expiry date by adding this number of months to the payment confirmation date.
- Click Save Settings.
Once connected, riders see a Pay Club Dues button on the club page instead of the pending payment message. Stripe Checkout handles payment collection, and Paceline activates the membership automatically as soon as Stripe confirms payment.
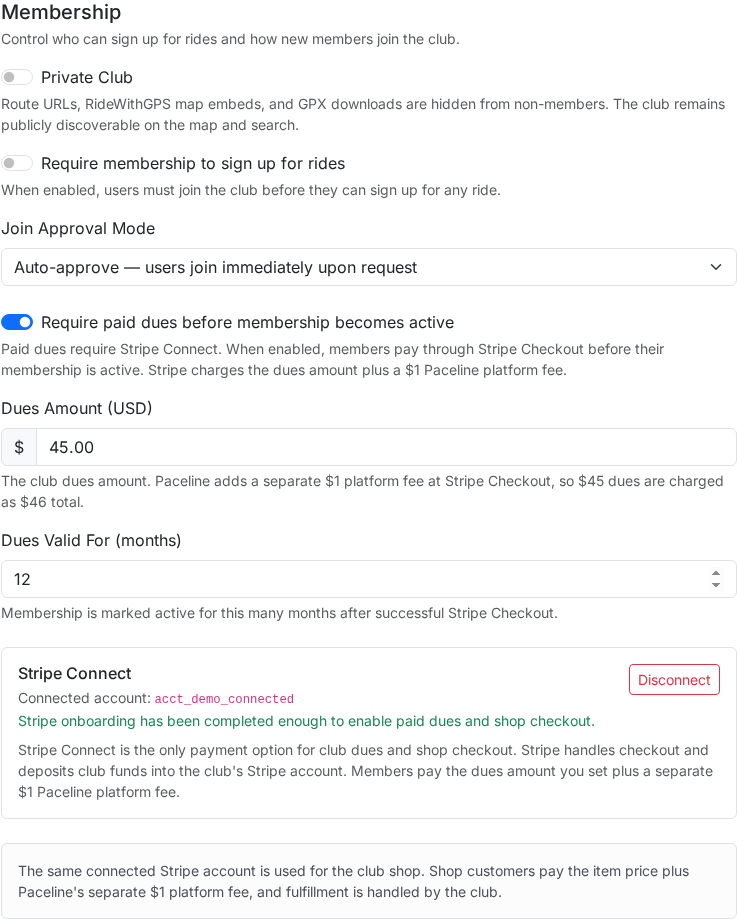
Disconnecting Stripe
You can disconnect Stripe at any time from Admin → Settings → Stripe Connect → Disconnect. Paid dues and shop checkout are disabled immediately. Existing membership records are preserved — active memberships remain active until they expire.
Importing an existing roster
When importing an existing member roster, you can set a paid-through date for the
entire batch or specify a per-row date using the format
[email protected], 2026-12-31. Imported members with a future
paid-through date are added as active. This is for migrating existing
records into Paceline, not for collecting new dues outside Stripe Connect.
11. Sell club merchandise
Club admins can add a simple shop for jerseys, shirts, or other club-managed merchandise after Stripe Connect is active. Open Admin → Shop, add an item name, description, optional image URL, price, and fulfillment notes.
Shop checkout uses the same connected Stripe account as paid dues. The item amount is paid to the club's Stripe account and Paceline adds a separate $1 platform fee at checkout. For example, a $65 jersey is shown as $66 total before any Stripe taxes or processing fees. Paceline does not hold the club's merchandise revenue.
Clubs manage their own fulfillment, pickup, shipping, refunds, tax compliance, and product questions. Paceline records recent shop orders in Admin → Shop so admins can confirm paid orders and follow up with riders.
Taxes and shipping
In Admin → Shop, a club admin can enable Stripe Tax for shop checkout. Stripe calculates tax during checkout using the club's connected Stripe account settings. The club must configure any required tax registrations or tax settings in Stripe and remains responsible for collecting, reporting, and remitting taxes.
A club admin can also enable shipping address collection and set a flat shipping fee. Stripe collects the shipping address and adds that fee at checkout, but the club is responsible for packaging, delivery, pickup coordination, refunds, and product support.
Each club can publish up to 50 active shop items. If an item already has orders, removing it archives the item instead of deleting the purchase history.
12. Embed rides on your website
Every club gets an embeddable ride widget you can drop into any website — your club's WordPress site, Squarespace page, or any platform that accepts custom HTML.
The widget shows your next 30 days of upcoming rides. Each ride is a link that opens the full ride page on Paceline. The widget automatically picks up your club's logo and theme color.
To get your embed code:
- Open Admin → Settings on your club page.
- Scroll to the Embed Ride Widget section near the bottom.
- A live preview of the widget is shown. Click Copy to Clipboard to copy the embed code.
- Paste the
<iframe>code anywhere in your website's HTML editor.
Example embed code:
<iframe
  src="https://paceline.club/clubs/your-club/embed"
  width="100%"
  height="650"
  frameborder="0"
  scrolling="auto"
  title="Your Club — Upcoming Rides"
  style="border:none;border-radius:8px;display:block">
</iframe>
You can adjust the height value to fit more or fewer rides in the widget.
The widget is responsive — it adapts to the width of its container.
13. Use advanced ride options
Recurring rides let you create a weekly template and automatically generate upcoming ride instances. Use this for steady weekly rides, then edit a specific instance when a single week needs a different route, start time, or cancellation note.
Capacity limits create a waitlist after the ride fills. If a confirmed rider cancels, Paceline promotes the next waitlisted rider and sends a waitlist promotion email when that rider has the notification enabled.
Use paid-dues requirements when riders must complete payment before signing up. Paceline shows riders the missing step — such as paying dues — instead of showing a normal signup button.
Waivers
In Full Club mode, Paceline supports a club liability waiver that riders must accept before they can sign up for rides. When a waiver is active, riders who have not yet accepted it are redirected to a waiver page on their first signup attempt. Paceline records the acceptance date and waiver version for your records.
Waiver text is managed by Paceline. To add or update your club's waiver, contact Paceline with the waiver text you want riders to see. Paceline will add it to your club and notify you when it is live. Updating waiver text creates a new version — members who accepted the previous version will be asked to accept the new one before their next ride signup.
The Garmin GroupRide field is optional. Enter the six-digit Garmin code if the ride leader is using Garmin's GroupRide feature. If the field is blank, a signed-up rider can add the code; after it is set, only the ride leader, ride manager, or club admin can change it.
Weather and AQI appear on ride and calendar views. Paceline is intentionally conservative about warnings: normal weather stays quiet, while poor air quality, high wind, heavy rain, snow, or extreme temperatures are called out.
14. Transfer club ownership
Use ownership transfer when a new volunteer takes over the club's online presence. Open Admin → Team, enter the new owner's email, and send the transfer request. The new owner must accept the emailed link before ownership changes.
When the transfer is accepted, Paceline makes the new owner an active member and full club admin if they are not already. The previous owner remains a club member unless you remove them separately.
If the current owner is unavailable, contact Paceline. A superadmin can manually transfer ownership after verifying the request.
15. Set up weather auto-cancel
Paceline can automatically cancel today's rides each morning when the forecast exceeds any threshold you configure — saving you the manual step of cancelling and notifying riders when the weather turns bad. Cancelled rides send the usual cancellation notification to members who have that option enabled.
The check runs at 6 AM each day and only evaluates rides scheduled for that day. Any single threshold being exceeded is enough to trigger a cancellation — conditions do not need to meet multiple thresholds at once.
Enabling auto-cancel
- Open Admin → Settings and scroll to the Weather Auto-Cancel section.
- Enable the Enable weather auto-cancel toggle.
- Set the thresholds that should trigger a cancellation:
- Rain probability (%) — cancel if the chance of rain at ride time exceeds this value. Default 80%.
- Wind speed (mph) — cancel if sustained wind exceeds this value. Default 35 mph.
- Min temperature (°F) — cancel if the temperature drops below this value. Default 28°F.
- Max temperature (°F) — cancel if the temperature rises above this value. Default 100°F.
- Click Save Settings.

Things to keep in mind
- The check runs once at 6 AM based on the forecast at that moment. If conditions improve after 6 AM, the ride is still cancelled — you would need to un-cancel it manually if you choose to continue.
- Rides that are already cancelled are skipped — auto-cancel will not double-cancel or overwrite a manual cancellation.
- Auto-cancel does not affect recurring ride templates, only the specific ride instance scheduled for today.
- You can disable auto-cancel at any time by returning to Settings and turning off the toggle.
16. Receive member messages
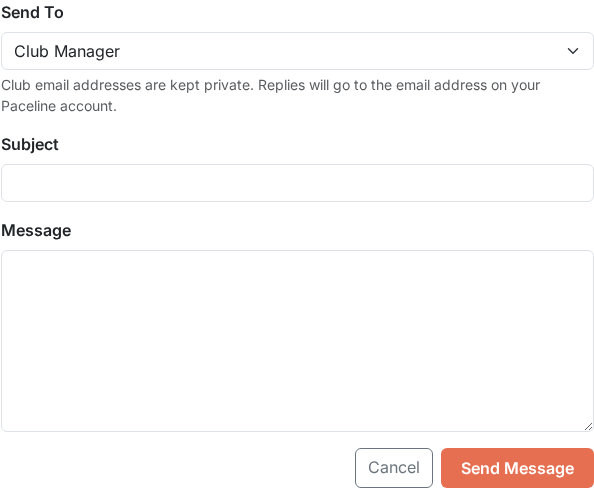
Every club page has a Contact tab that lets any signed-in rider send a message directly to the club's management team. When a rider submits the contact form, Paceline forwards the message to the club's contact email address and copies the sender so they know it was received.
The contact email is the address you set in Admin → Settings → Contact Email. Make sure this address is current — it is where all member contact form messages are delivered. You can reply directly to the forwarded email and your reply goes straight to the rider.
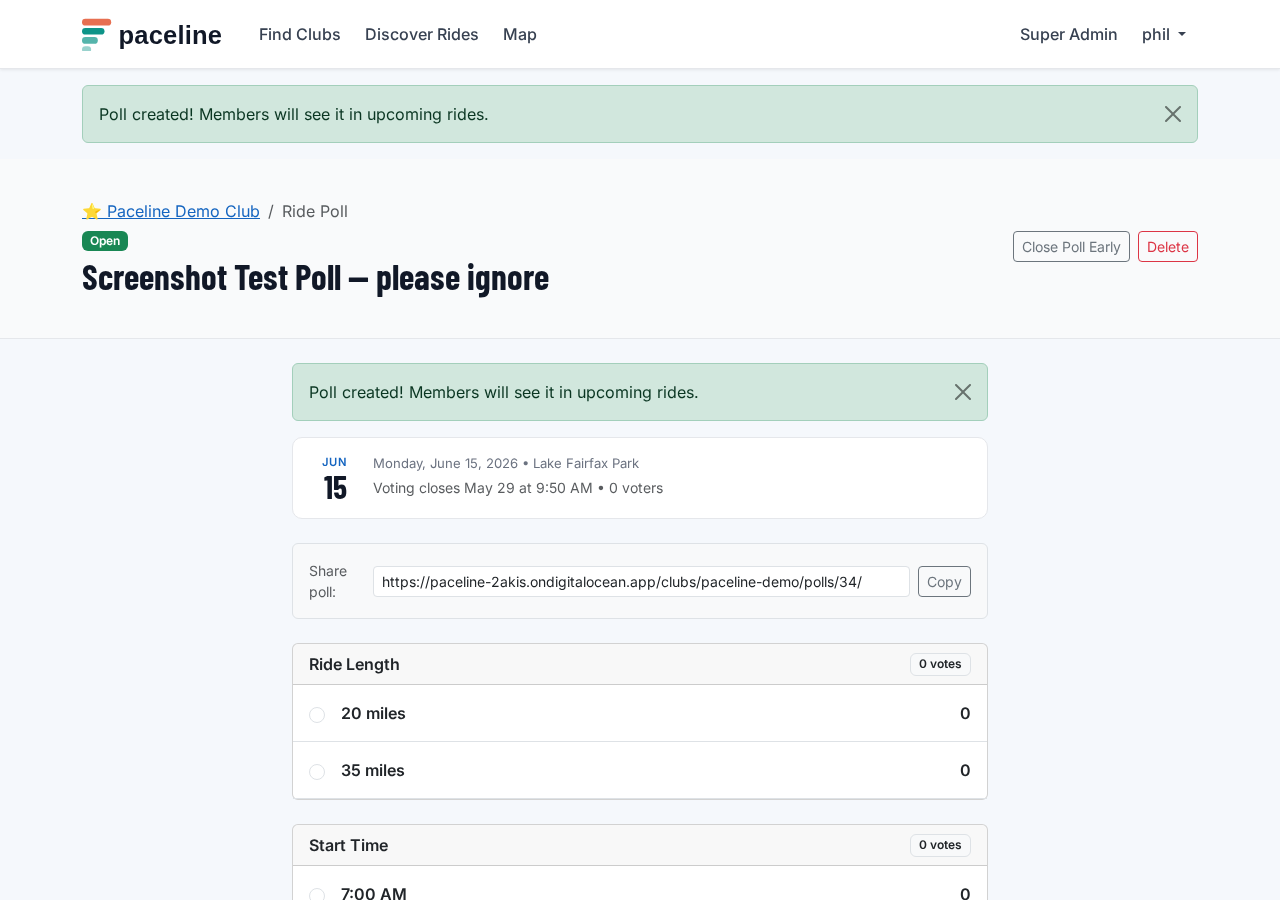
17. Use ride polls
A ride poll lets you ask members to vote on the details of an upcoming ride before you schedule it. Instead of deciding everything yourself, you post a poll with options — members vote, and when voting closes the winning choices are used to create the actual ride. Everyone who voted receives an email with a direct sign-up link.
Use a ride poll when you are unsure about one or more of: the ride distance, the route, or the start time — and you want member input before committing.
What you can poll on
Each poll can include one, two, or all three of the following categories. Members cast one vote per active category.
- Start Time — offer time options such as "7:00 AM", "7:30 AM", "8:00 AM".
- Ride Length — offer distance options such as "20 miles", "35 miles", "50 km".
- Course / Route — offer route names or paste RideWithGPS URLs directly. If a RideWithGPS URL wins, it is automatically linked to the created ride.
Creating a poll
Go to Admin → Rides and click + New Ride Poll. The form works like the standard ride form — fill in everything you already know: title, date, meeting location, pace, ride type, leader, and so on. Only the fields that correspond to a polled category are hidden (for example, if you are polling on start time, the start time field disappears and members decide it).
At the top of the form, check the categories you want to poll on, then enter the options — up to 10 per category. Options are free text: write anything descriptive enough for members to choose between.
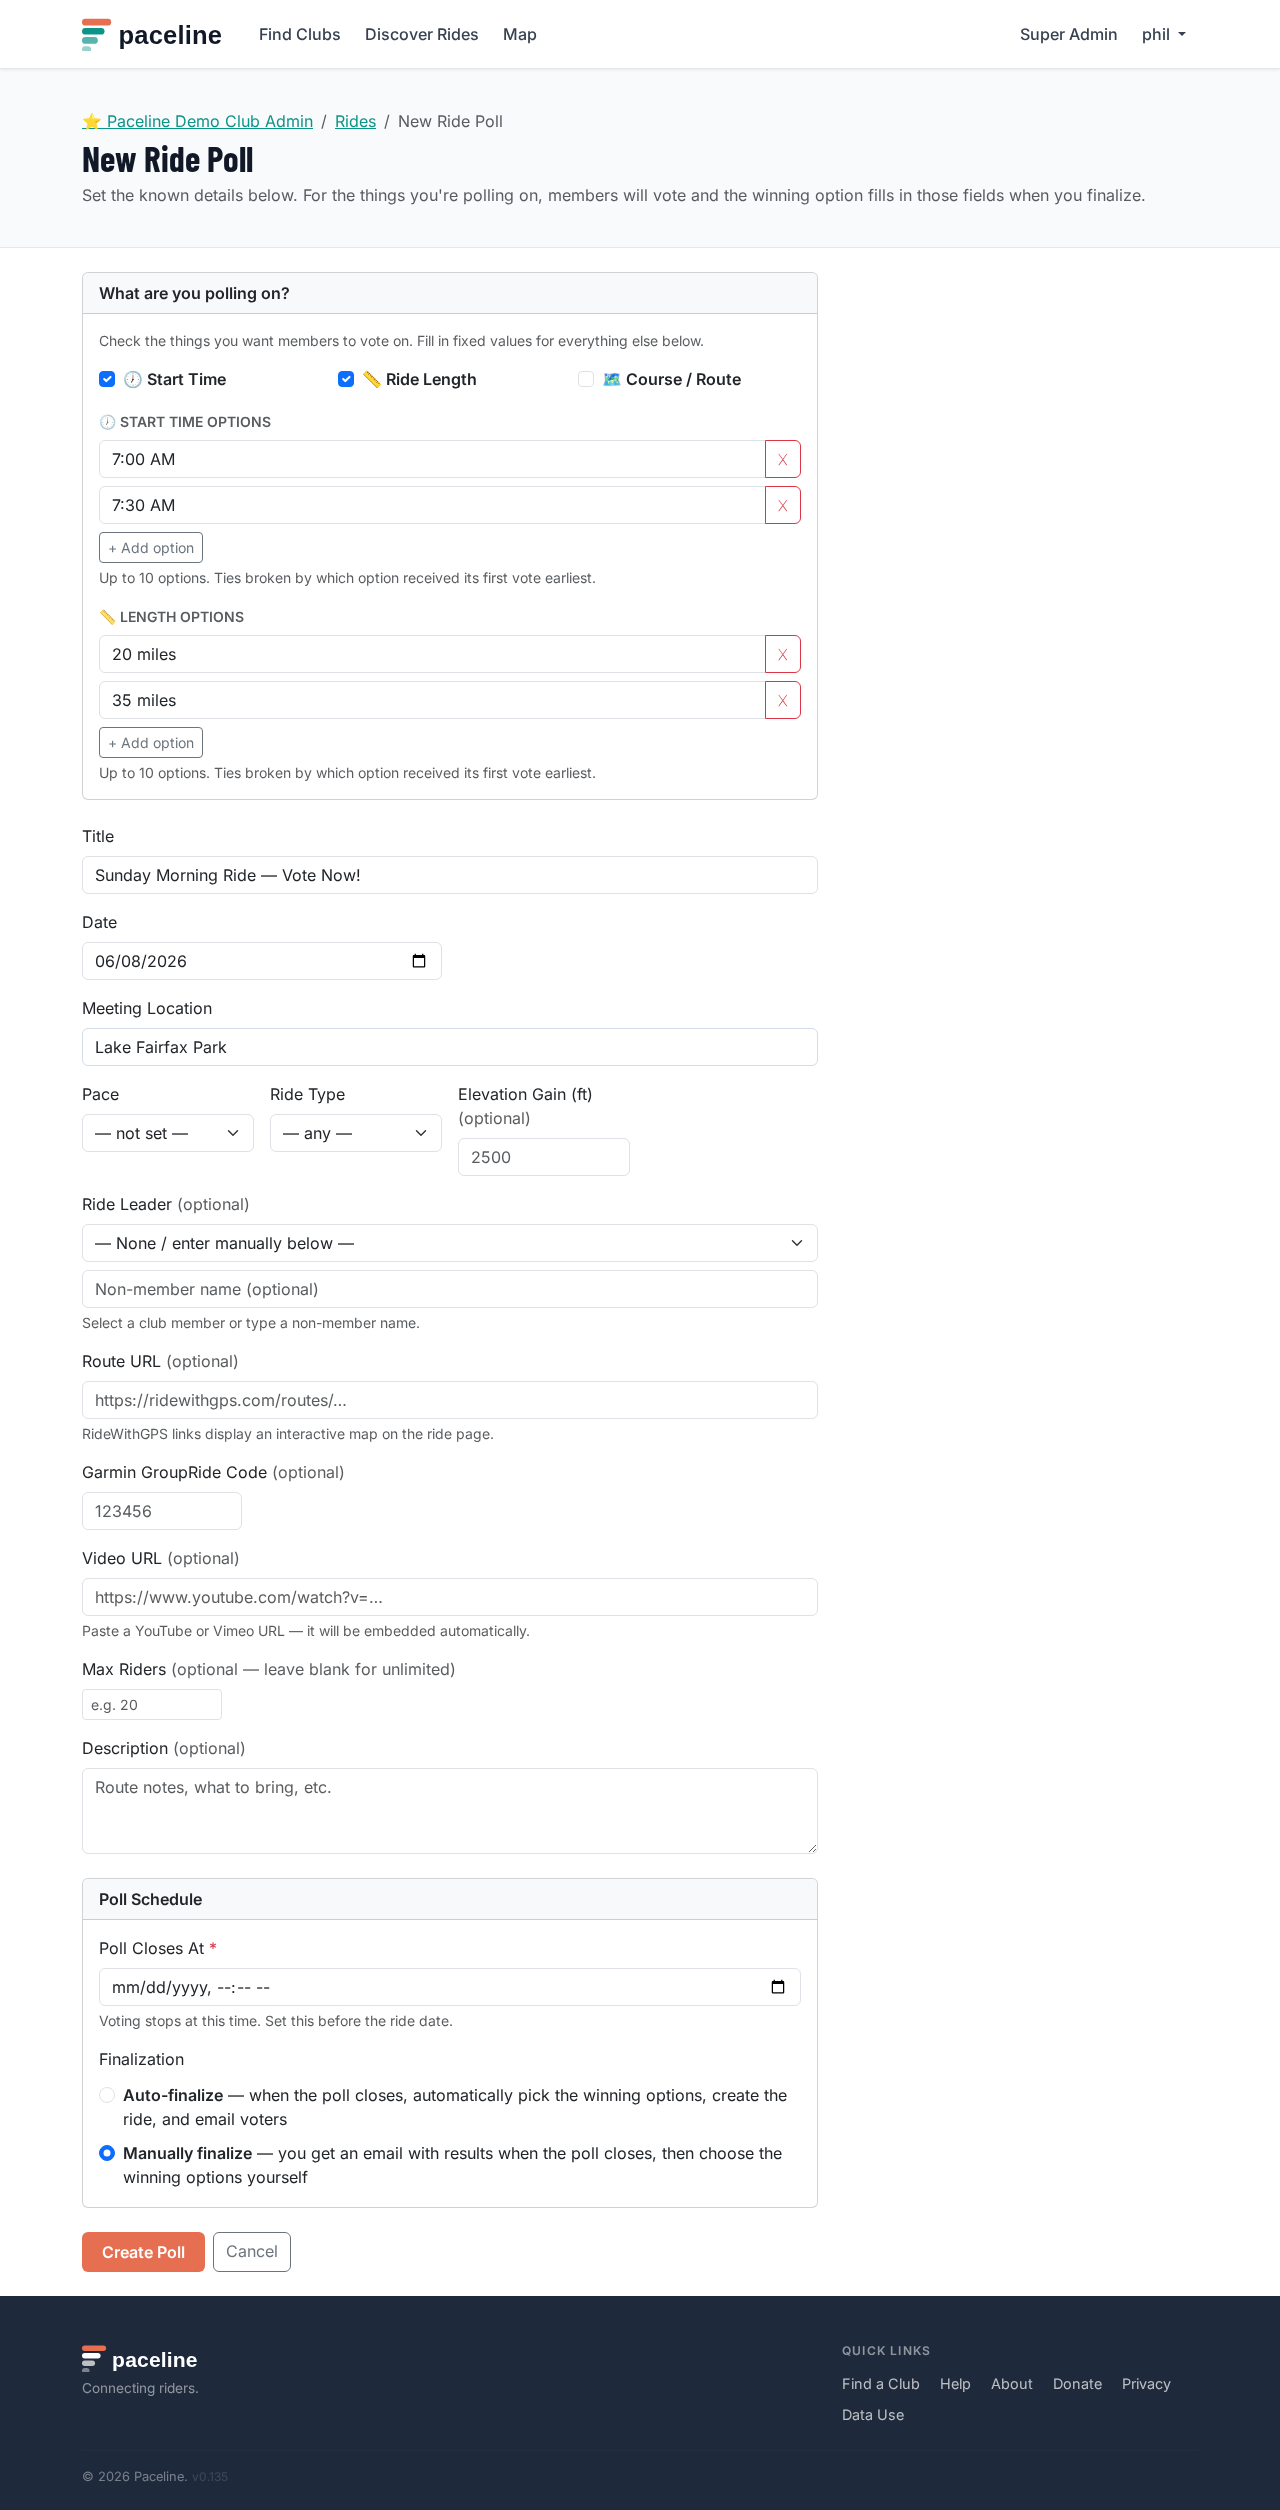
Set a poll closing date and time — this is when voting stops. Choose a time that gives members at least a day or two to vote, but is still early enough to leave time to finalize the ride and send notifications before the ride date.
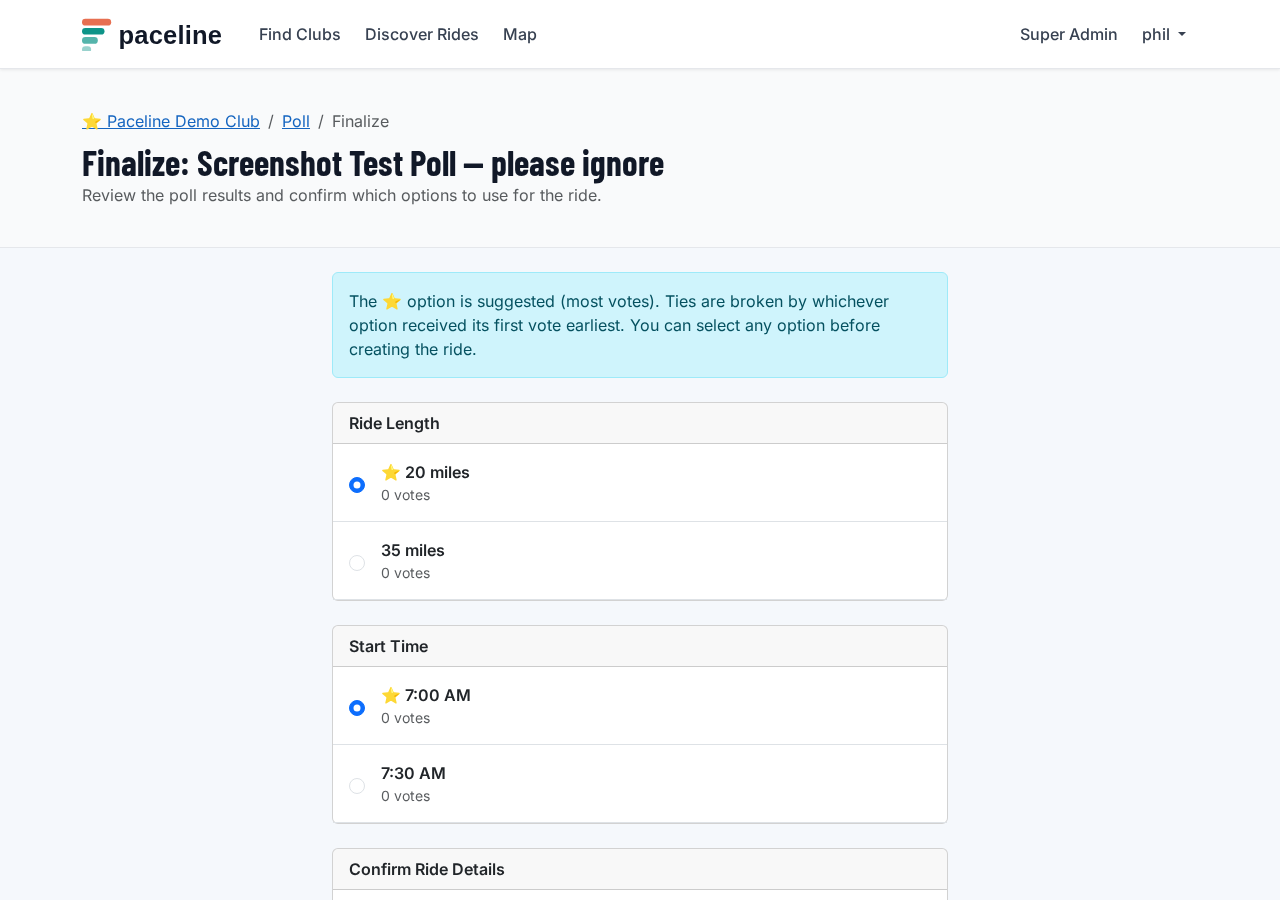
Auto-finalize vs. manual finalize
When creating a poll you choose how it closes:
- Auto-finalize — when the poll closing time arrives, Paceline automatically picks the winning option in each category, creates the ride, and sends a notification email to everyone who voted. No action is needed from you. Use this when you are happy to let the vote stand on its own.
- Manually finalize — when the poll closes, you receive an email with the full results and a link to the finalize page. You review the results, confirm (or override) the suggested winners, then click Create Ride & Notify Voters. Use this when you want a final say before the ride is posted — for example, if a tie requires judgment, or if you want to review write-in route suggestions before accepting them.
How members vote
Open polls appear as highlighted cards in the club's Upcoming Rides section, clearly marked with a green "Poll Open" badge and a Vote → button. Members must be signed in and belong to the club to vote.
On the poll page, each category is shown as a list of options with a live vote bar. Members select one option per category and submit. They can return and change their vote any time before the poll closes — the most recent choice counts.
The poll is intentionally public within the club: voter names are shown on each option. This transparency encourages participation and lets members see what their group is leaning toward.
Members can share the poll using the copy-link button on the poll page. Only members can vote, but the link can be used to remind people to participate.
Tie-breaking
When two or more options end with the same number of votes, the winner is the option that received its first vote earliest. This rule is shown on the poll page so members know how ties are resolved. If you are using manual finalize, you can always override the suggested winner on the finalize page regardless of the vote totals.
Closing a poll early
Ride managers and club admins can close a poll before its scheduled time using the Close Poll Early button on the poll page. Once closed, voting stops immediately. Auto-finalize polls create the ride right away; manually-finalized polls send the leader the results email and wait for the leader to act on the finalize page.
Finalizing a ride (manual mode)
When a manual-mode poll closes, you receive an email listing the results — each category, every option, its vote count, and the suggested winner (marked with a ⭐). Click the Finalize the Ride link in the email, or navigate to Admin → Rides and click Finalize → next to the closed poll.
On the finalize page, each category shows all options sorted by votes. Select the option you want to use for the ride — the suggested winner is pre-selected, but you can choose any option. Click Create Ride & Notify Voters when ready.
After finalization
Once finalized (automatically or manually), Paceline:
- Creates a fully-fledged ride with all the details — including the fixed fields you entered when creating the poll, combined with the winning options.
- Sends a Ride Confirmed email to every member who cast at least one vote, with the ride details and a direct sign-up link.
- Updates the poll status to Finalized and links it to the new ride in the admin panel.
The created ride appears in the club calendar immediately and can be edited from Admin → Rides like any other ride.
Managing polls from the admin panel
The Admin → Rides page lists all polls below the rides table. The table shows each poll's status (Open, Closed, Finalized), voter count, closing time, and quick-action links. Polls without any votes can be deleted from the table. Polls that have received votes cannot be deleted — close and finalize them instead, or let them auto-finalize.
- Limit options to meaningful choices — two to four per category is usually enough. More options split votes and make ties more likely.
- Set the closing time at least 24–48 hours before the ride date so there is time to finalize and for members to see the ride and sign up.
- Use auto-finalize for straightforward votes (e.g., start time) and manual finalize when you want to sanity-check route URLs or handle unusual tie situations.
- Remind members to vote in your club board or WhatsApp group — polls only work if people participate.
18. Share rides
Every ride page — both club rides and personal hosted rides — has a Share Ride button. Use it to send ride links to your members directly, in your club's WhatsApp group, or on social media.
When the link is shared to iMessage, WhatsApp, Slack, Twitter, or any platform that supports link previews, it automatically shows a rich preview with the ride title, date, distance, pace, and meeting location. This gives recipients the key details without needing to click through, making it more likely they will sign up.
On mobile, the Share Ride button opens the device's native share sheet. On desktop, it copies the link to the clipboard with a confirmation toast. The link works for anyone — even people who are not yet Paceline members — so it is a useful way to introduce new riders to your club's rides.
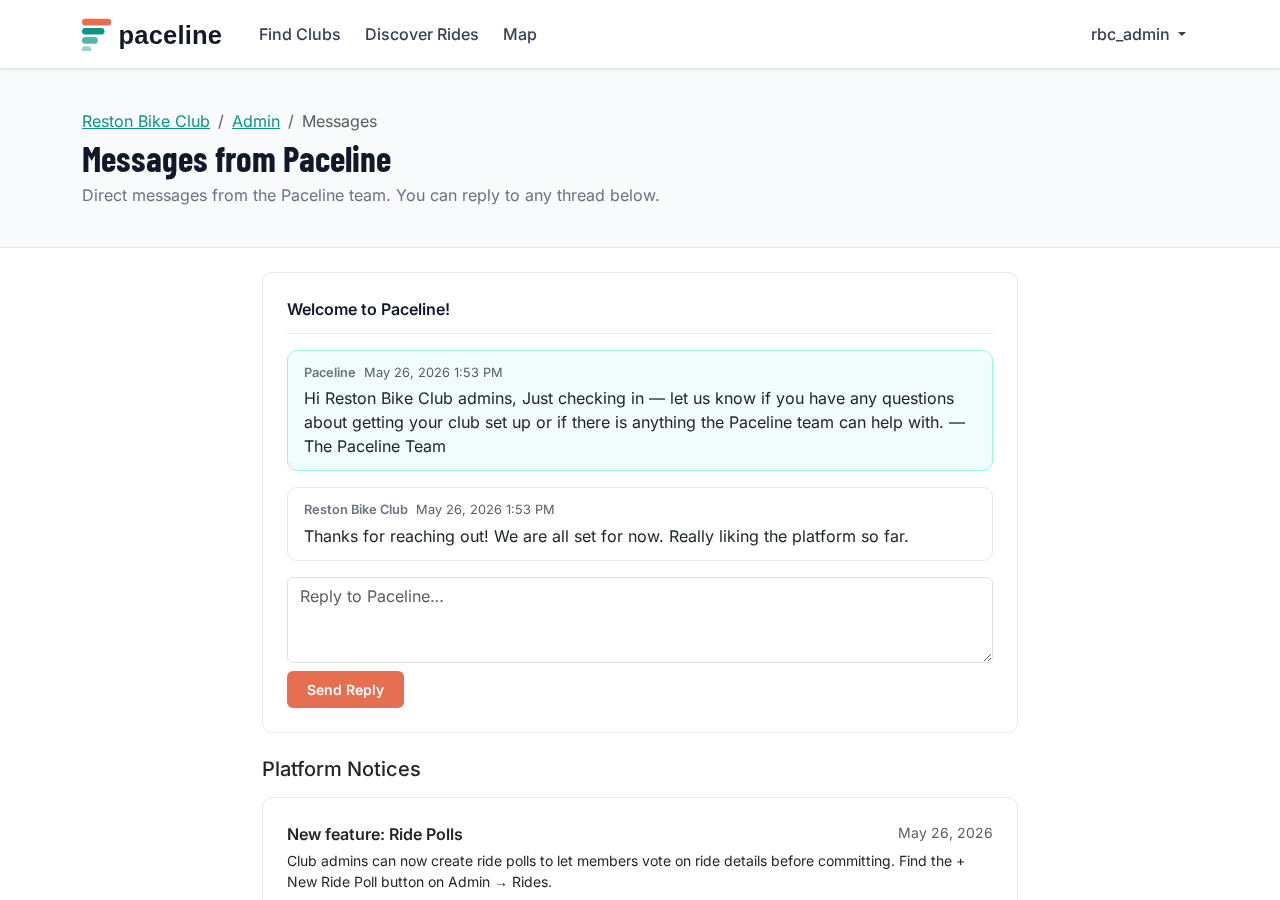
19. Messages from Paceline
Paceline can send direct messages to your club's admin team through the platform. These appear in your club's Admin → Messages section and are also delivered by email to all full admins on your club.
Messages may include platform updates, policy changes, support follow-ups, or questions about your club. You can reply directly in the dashboard — your reply is threaded alongside the original message and goes to the Paceline team.
Where to find messages
- Open your club's admin dashboard. If there are unread messages, you will see a red badge on the Messages button in the action bar at the top of the dashboard.
- Click Messages to open the thread view. Each message from Paceline is shown with a reply box below it.
- Type your reply and click Send Reply. The Paceline team receives an email notification and can continue the conversation.
Platform-wide notices
In addition to direct messages, Paceline occasionally sends Platform Notices — broadcast announcements to all club admins at once. These might include upcoming maintenance windows, new features, or important platform policy updates. Platform notices appear in a separate section at the bottom of the Messages page and are not replies to a specific thread. Club admins cannot reply to broadcast notices.
20. New Rider Friendly rides
When creating or editing a ride, check the New Rider Friendly box to signal that the ride is welcoming to first-time road cyclists. This adds a distinctive green badge to the ride card everywhere it appears — on Discover, on your club home page, and on the ride detail page — so beginners can find it easily.
Use this flag for rides where:
- The group stays together and no one gets dropped.
- Ride leaders are available to answer gear, route, or etiquette questions.
- The pace is appropriate for someone new to group riding.
- The atmosphere is explicitly beginner-friendly and supportive.
How to flag a ride
- Open Admin → Rides and click Edit on any existing ride, or create a new ride with + New Ride.
- Scroll to the bottom of the form and check New Rider Friendly — welcoming to first-time road cyclists.
- Save the ride. The green badge appears immediately on all ride listings.